

(I apologise in advance – a much more wordy and pic heavy post than usual.)
I’ve said it before, and I’ll say it again – I’m not in this for terrain building. I’m not that good at it. I do enjoy it but I do get bored and sidetracked easily. And I start resenting it when I realised it has taken me down a rabbit hole and eaten up time I’d rather be using damaging my huge lead pile.
But I do agree with the premise that GOOD TERRAIN IS IMPORTANT. “We spend hours painting detailed miniatures for people to look at, then why not also the terrain the are played on?” More importantly, your little guys need somewhere nice to live…
Thinking aside (who needs that?) I decided I wanted to make some sci fi terrain for some interior skirmish actions. I’ve plenty stuff for sci fi habitations, colony bases, post-apoc shanty towns and the type of stuff you’d use for Infinity (cargo containers galore). Even enough for a small city using, amongst other things, Dropship Commander card terrain which works very well with 15mm btw.

As to interiors; I’d toyed with the idea of using Space Hulk floor tiles for bug-hunt/spaceship based environments.
I’ve even bough in to the (fairly) recent stuff from Battle Systems, both sci fi and fantasy.
It is good stuff and with a little effort I’ve every intention of using it (especially now that I’m back on the 28mm bandwagon). It is also, in part, useable with 15mm. Those bits that are not I’m sure I can tweak to work. Another project.
So, long (and boring) story short, I went looking online as one does. I’ve been on Spacejackers excellent site before and I’m sure it was a hazy memory of seeing this project before that drew me there again. I think the phrase ‘spot on’ sprung to mind.
It had all the elements I was looking for. Modular, yet solid (Battle Systems is quite fiddly); pretty yet simple to make. I duly went about ripping the idea off.
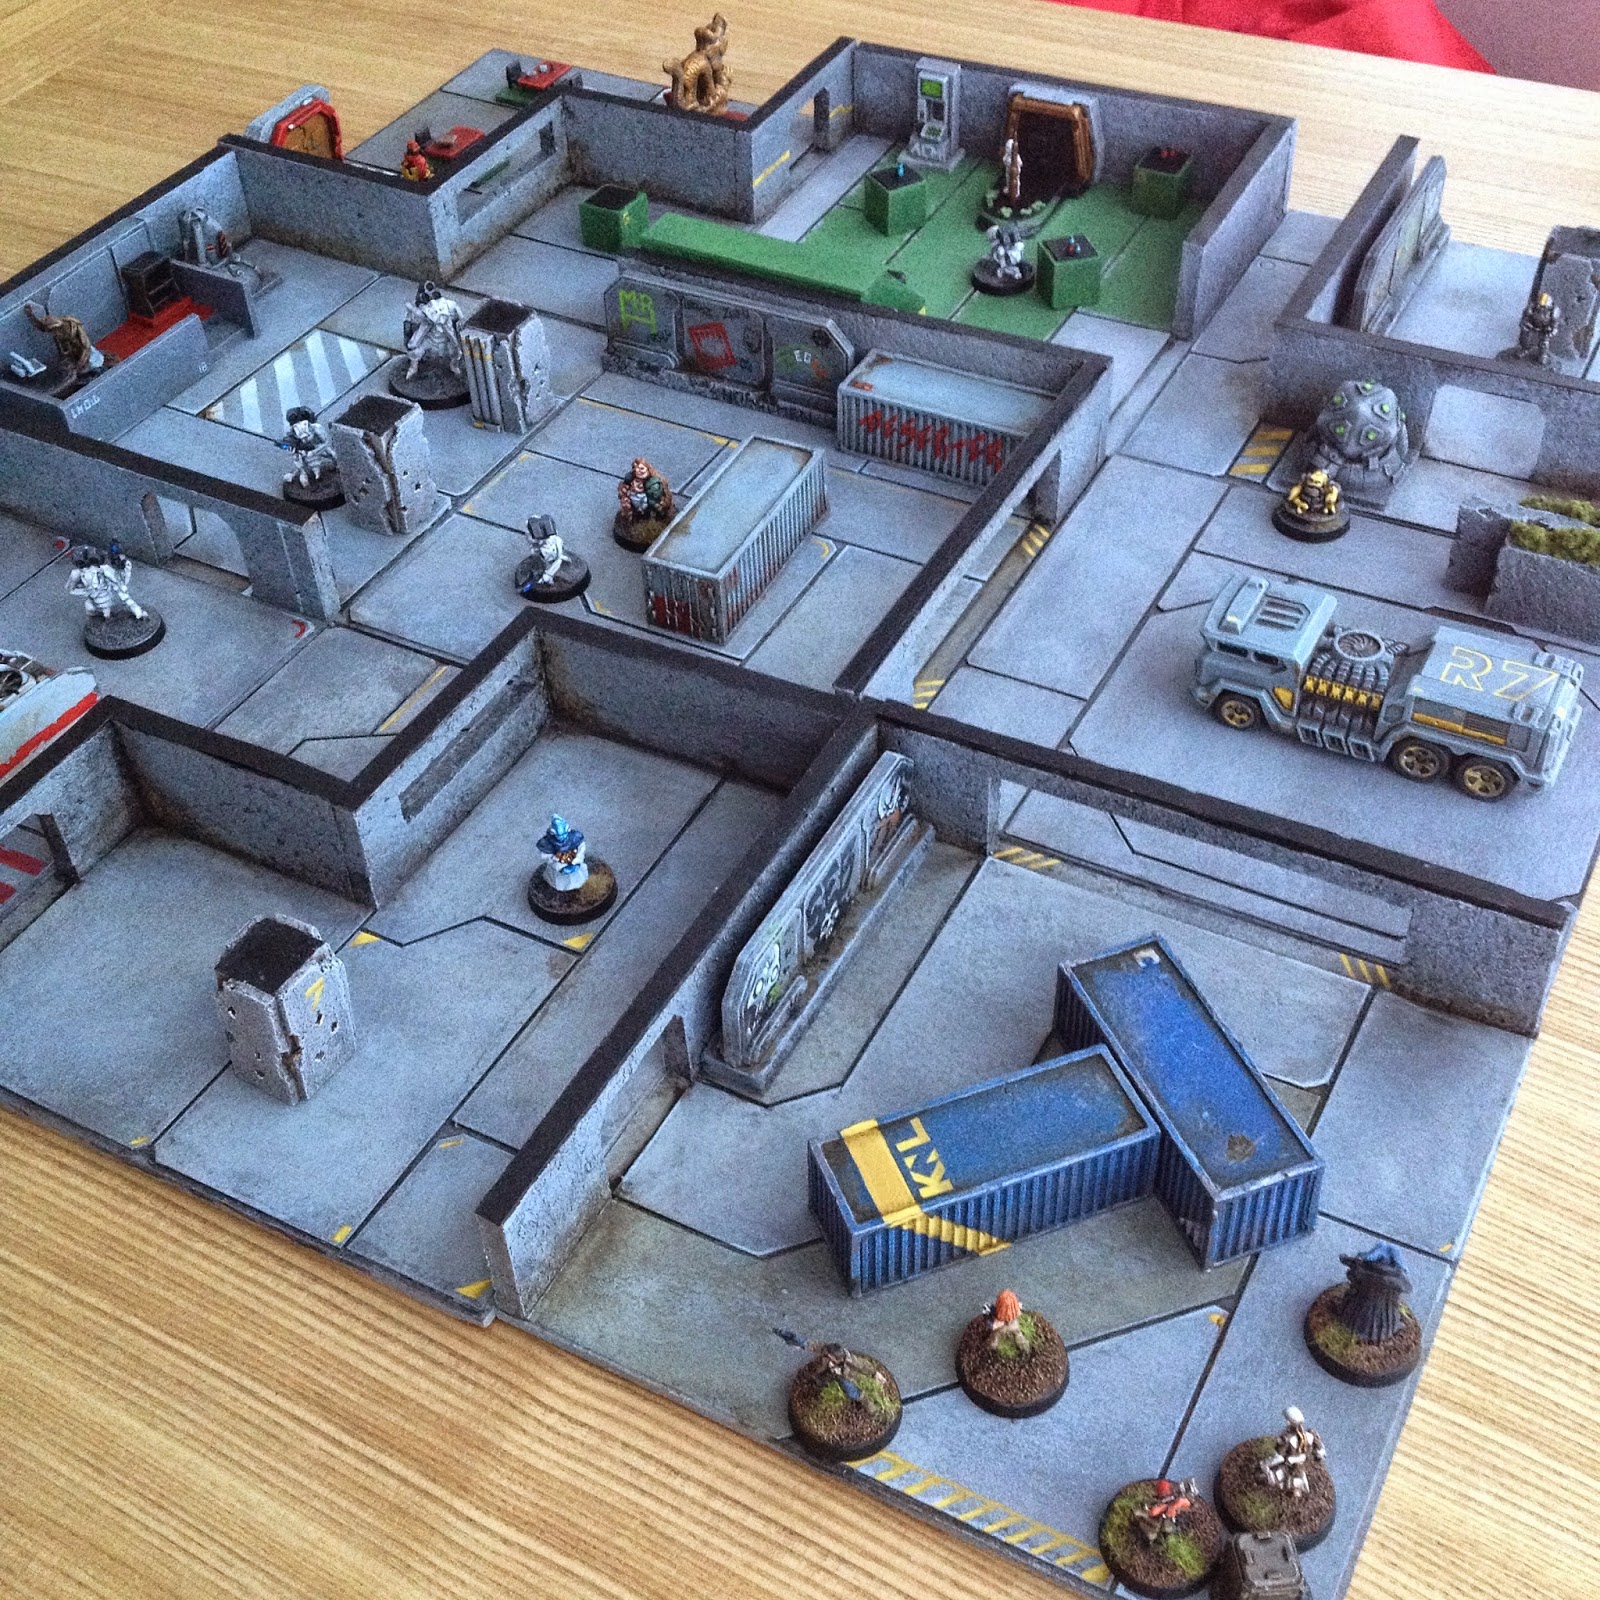
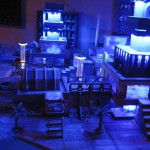
I’d recently bought a bulk load of 5mm foamcore sheets so that was going to be the medium for the build. I was also going to tweak it so that I could stack the tiles (this has implications later…). I also was not going to paint the hole thing (at least to a standard I’d be happy with) so decided I’d resort to my wall-paper approach, i.e. skin the floors and walls with printed textures drawn from various paper terrain sets and scans of other bits I have.
Part of the reason for that approach was that I did not want the over all look ‘too unified’. I wanted something a bit more organic and less Death Star/Space Port. I think I achieved that BUT on reflection I think the whole result together has become too busy on the eye and draws away from ‘action’. Time will tell on that.
So that was the aim and that aim was achieved to my satisfaction. To complete all I needed to do was make or acquire bits and bobs to populate the rooms (other than miniatures of course – I’ve a few of those).
HOWEVER – this is where the ‘spiralling out of control’ part of this post’s title comes in. Take the following as a word of warning or as a source of inspiration – all depends upon your sensibilities.
First mistake I made was placing the tiles on top of the board I’d printed out for a previous ‘scape’ which I mentioned a while back.
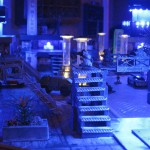
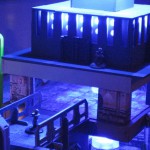
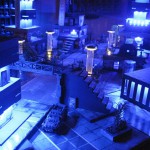
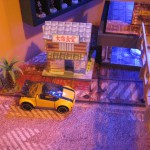
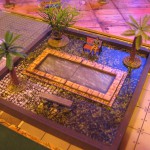
Here are a few of the finished tiles arranged in the manner they were intended. See the potential? And see the problem?


Now they look like they could be the interiors of buildings along the side of the street.


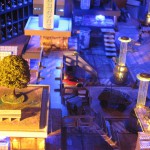
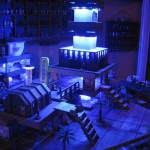
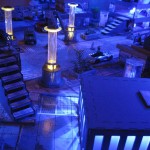
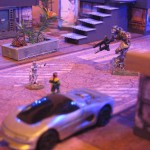
Second mistake was to stack them (although that had been an intention for storage purposes). Oh look, they look like multi-floor buildings now with accessible interiors… (see where this is going?)

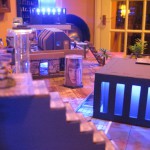
Third mistake – All good sci fi terrain/buildings have walk ways connecting them. Let’s add a few with a couple of handy makeshift gantries.


At this point the ‘multifunctional’ part of me took over and I decided to make roofs for the tiles to a.) allow them to be used as stand alone buildings with removable roofs and b.) make them properly stackable (because of the wall configurations not all were naturally balanced/stable without the roof due to insets and corridor sections). Now the design principle Spacejacker followed was to have two walled sides and two open sides on each tile. That is where I started and this is perfectly fine for using the tiles only as open tiles. However without additional support it wouldn’t be possible to carry a roof.
As a result I added ‘minimal’ supports in various positions that would allow for a roof to sit on top and allow for stacking but still have an open enough floorplan to be used with the original intent. Personally I think it adds to the ‘flat tile’ use as well perhaps at the expense of making everything a bit more cluttered.


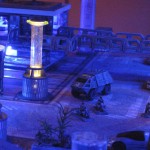
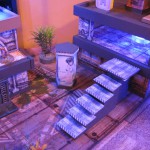
There was also the introduction of a new issue which was access to floors above ground level. Internal stairs/access could be assumed but some of the access were literally doors and not just open areas. That meant I needed some external access to these areas = more stairs or ladders.


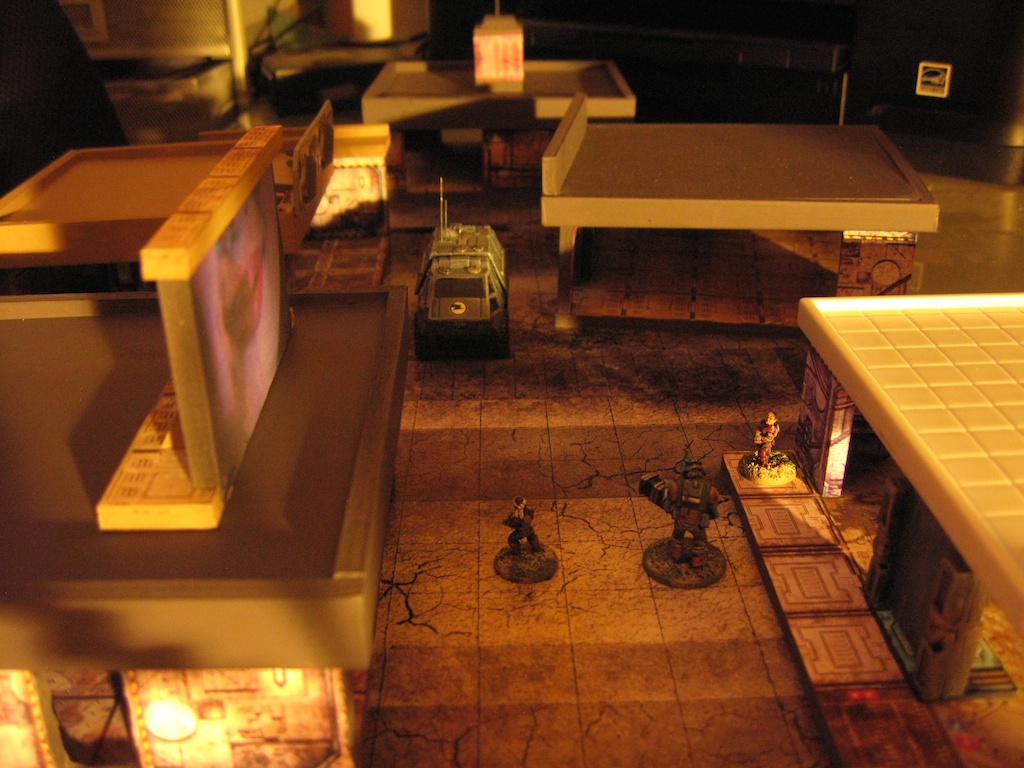
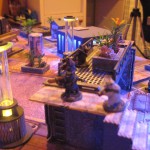
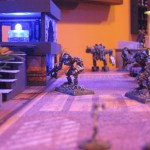
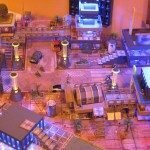
This was amplified (I should say ‘illuminated’) by the arrival of some rather interesting items I’d picked up on a new Kickstarter. I’d already bought a few items from Thomas Farnell of Wargame-Model-Mods so it was with interest that I (modestly) jumped in for some ‘lighting terrain’. Add some bits of the afore mentioned Battle Systems terrain, some card terrain and a few ‘Block’ signs with a handful of miniatures…


Clearly still too dark. Something was missing – now that a dozen additional electronic ‘tea lights’ have arrived after the Christmas rush I can now light up some of the interiors as well…
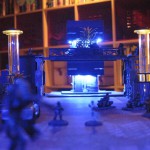
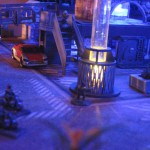
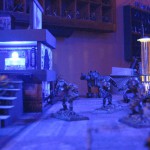
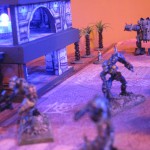
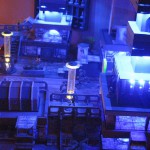
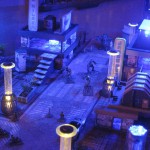

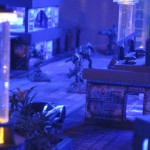
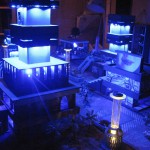
Due to poor photography skills you’ll have to believe me that this is actually light enough to play with the main lights off. Aside from the cluttered and rough finishes I think it ‘captures’ that Blade Runner/Mega City One vibe quite well.
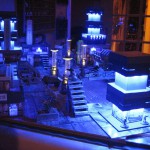
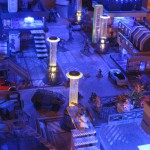
A few photos with the lights on…

Stacking time. Whilst this works and is pretty stable, unless everything is bolted down, it is totally impractical for games. (Note to self, consider magnetised floors next time.) 


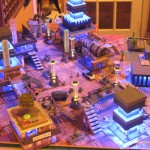
But it does disassemble in seconds and can be quickly deployed as a little town…


A few little quickly pulled together ‘possible’ uses. All I need now is either a good source of room furniture/clutter or more finger bending paper model making…


Again, I apologise for the extreme number of photos but I got carried away on this occasion.
UPDATE
I recently found that the great Matakishi also stumbled upon Spacejacker’s concept and used that to create his own variant which is also (unsurprisingly) amazing. If you’ve not visited
Matakishi’s Tea House then it is a MUST DESTINATION for any gaming related stuff.
Wow amazing, I struggle with Terrain, just not enough time, but I have managed a small set of terrain for historical gaming, I really want to put together a sci fi interior space hulk like set up like yours, one day, your stuff is amazing.
Thank you Dan. I pretty sure if you were applying the same talent you do to your minis to terrain it would be pretty awesome!
Very impressive! Well done and perfect timing! I’ve been investigating terrain options for SF in particular recently so this post has added to the inspiration tree!
I’ve already got two scratch build projects (VSF streets and an ancients chariot racing track) to complete, so I’m looking SF terrain options to enable me to get something ‘on the table’ without too much effort for the likes of Infinity and UFO Squad.
Now, when are Sam and I going to get to play with it?!
Great. Glad it sparks some ideas. That’s the whole point.
As to playing on it… well, it is stackable and transportable! I don’t really have the setup here at the moment to entertain but with a bit of planning I’m happy to shuffle stuff around for a game.
Still on my to-do list to make it through to the Falkirk Club sometime. Long list…
Excellent again, Jimboba. It’s just the perfect look for those Judges to patrol.
I’ve a different half finished interiors project in the shed but I may well steal you roof idea for the storage & play options you mention.
Also thanks for the Matakishi link, somehow I’d missed that article (he doecn’t do things by half, that man!)
I do like the judges. Now I’ve a few in 28mm too! (Still in box though!)
Yes, Matakishi is quite the talent. I’ve even bought his skirmish Conan rules ‘Crom!’ to do something with these fellas till the 28mm Conan game ships (+ 1 year for painting). https://warchest.co.uk/blog/index.php/conan-crom-that-looks-painful-15mm-copplestone/
In typical ‘me’ fashion I’ve not even read them yet.
Blimey
Bulby more like
What were the sources for some of your wall/tile surfaces? Any favorites, or ones to avoid? Did you need to scale things down, or did you just use it at the stock sizing?
Where did the ‘command console’ come from?
Sources – I have folders full of printable terrain which I raked through and pulled out textures that fitted so I can’t be exact. Likely to be from one or more of the Worldworks sets.
I determined my wall sizes and door positions and scaled the artwork to fit using Illustrator. So yes they are scaled down, likely around 60%.
The command console is from the Battle Systems Sci Fi set (with trimmed down legs for the vertically challenged users).
Hope that all helps a little.
> Sources – I have folders full of printable terrain which I raked through and pulled out textures that fitted
Ha, this is the approach I use. Dave Graffam Models being one major source for me. Handy since you can really kitbash and use things unconventionally if they fit. I wish I had your dedication to produce some amazing layouts but since I really just use them as backdrops for creatively photographing my painted figures, I can’t muster the time or effort to really pull out the stops like this. I should check out coloured lighting though, I bet I’d get some fun results 🙂
Not sure ‘dedication’ is the right phrase – I’m pretty hack and slash and speed orientated when it comes to terrain.
Great blog you have there which I’ve left open in a tab for proper consumption. I see the good use of backdrops for your pics (and recognize a lot of the paper terrain stuff too!). I’m also a big Graffam fan when it comes to fantasy stuff.
I’d think some atmospheric lighting would be a cool addition, especially to some of your story vignettes. Great stuff.
Hello again Jimboba,
I agree with you completely, you can never have enough terrain :):):). What I’m planning to do is print 1ft or 2 ft sq terrain layouts with 20mm squares & do 5mm foamboard or 3mm mdf walls ( 4-5 cms high to 10-30 cms long ) with printed paper walls. That way everything can be packed nicely flat , space being always at a premium. What I still have to decide is how to do the wall layout, still undecided whether to fit a card base on each wall or use magnets. This will let me do any wall layout I want . Hope this helps.
keep up the great posts , always good to read.
Z
Hi Z. Thanks for stopping by and sharing.
One consideration on the magnet use. I went down this route with this board (https://warchest.co.uk/blog/index.php/city-town-terrain-for-mordheim-or-frostgrave-fantasy-games/). For that type of terrain I find the method pointless unless everything is magnetised. (I might well recycle the boards for a dungeon layout…)
I think the same approach would be better still with your aim to get a modular/flexible wall system. If the base isn’t entirely magnetised (or the reverse, susceptible to magnets) then the method would be pointless. It would be far ‘neater’ than wall bases but quite a bit more £$.
Without the justification of the time or the cost, I think I’d go with paper model walls weighed down with coins etc at the foot. But I’m cheap and lazy.
hi , how did you do the roof pieces ?
great work.
Hi James – Basically the same materials and method as the rest – foamcore with careful measuring and white glue.
Bit more info in the post: “Some of the roof sections (‘floor trays’) are not the full 5×5 size to add a bit of variety. However there does need to be enough full 5×5 to perform the role of the first floor roof when in use. They all have a 0.5cm lip top and bottom so that they sit comfortably between tiles offering enough non-slip control. They are effectively small trays.”
There was one roof section – which may have triggered your question – which is different. It’s a molded hard plastic ’tile’ from one of my kids abandoned toys. I had ‘acquireda’ it ages ago with the view to using it in terrain and it happened to be an exact perfect fit for a roof section. (In the pics it is the light grey roof with a tile effect on it).
This stuff is great. I studied your problem photos for quite a while and I could not see the problem. Maybe you are being to critical and your buildings look great?
I really liked the blade runner ad… although it looks really creepy. I never would have thought of cutting a picture out of a magazine and gluing it to foam board.
This is very innovative stuff. The dust in the tunes gives the light a poorly maintained look so common in a sci fi dystopia.
A bit tardy of me, so belated thanks for your kind comments. Glad my recorded efforts may have given you some ideas or inspiration at least.